Wednesday, September 28, 2016

CROCHET COWLS by Sharon Hernes Silverman

When I look at a book, and think about adding it to my Crochet books library, I have certain criteria that I look for in the book, and it should meet most of these if I am going to add it. So when I was asked to review this book, Crochet Cowls by Sharon Silverman, I thought I would look to see if it met my criteria.


Here is what I look for:
1. Do I know the author? Or have I heard of the author?
In this case, yes, to both. I have heard of the author. And I know the author, Sharon Silverman. I have several of her books, some I have reviewed. I know how thorough she is with her instructions. I know how knowledgeable she is, also. Years ago, when she was just starting out, she took one of my classes at the Crochet Guild of America's Chain Link conference. It's difficult to remember everyone you meet at a conference, but I know that we've been corresponding lately, and I feel that I know her. Disclaimer: whether I know the author or not, that doesn't influence me when I review their work.
2. Who tech edited the book? Who did the charts? Do I know or have I heard of them?
I am a tech editor, and I know how difficult it is to tech edit a book. In this case, I couldn't find a name for the tech editor (it might have been listed as "assistant editor"). But I did find a name for the person who did the charts – Lindsey Stephens. I know her, and know that she does excellent work. So I know the charts and stitch diagrams will be correct.
3.What about the skill levels? Are the designs for just one skill level, or many different skill levels?
There are 15 designs in this book, and the skill levels are divided between them – 4 Easy, 8 Intermediate, and 3 Experienced. So there is something for everyone!

4. What about the yarn? What type of yarn is used?


Once again, Sharon thought of everyone's preferences for yarn. The yarn weights range from Lace weight (0), to Jumbo weight (7). In other words, the yarn weights are: lace, super fine, fine, light, medium (also known as worsted), bulky, super bulky, and jumbo. So whether you like working with Jumbo yarn, or  Lace weight, or anything in between, you'll find at least one cowl you can crochet. And perhaps you'll also try a yarn weight that you don't usually use! It's a great opportunity to expand your skills!
5. What about special stitches and techniques? Are there any? Do you have to look in the back of the book for them, or are they included in the pattern directions?
If a cowl uses special techniques or stitches, the instructions, along with great pictures, are included with the directions. You don’t' have to search for them!
6. Stitch diagrams? Are they included with each pattern?
Each of the 15 patterns has at least one stitch diagram that shows a section of the pattern. That is my favorite part of any book. When I see a pattern I like, I want to crochet a section of it first – to see if I can follow the pattern, and to see if I like the way the stitches look in the yarn that I want to use. So I always look for stitch diagrams, to help me with my swatching. I use them to make gauge swatches, and to test new stitch patterns. Sometimes (and this is why I love stitch diagrams) I just use the stitch pattern, and crochet myself something else, not the original pattern that it came from! But however I use them, I know that reading stitch diagrams is usually a lot easier than reading patterns – long ones or short ones.
7. Anything else?

Yes!. In the back of the book, there is a section of the basic crochet stitches – with directions, and pictures. Just in case! Also, just in case, there is section on Tunisian Crochet (used in some of the patterns), and, some helpful hints for Tunisian Crochet. Then, there is information on how to read a pattern, and how to read a stitch chart or diagram - including Tunisian stitch diagrams. Then the usual stuff is included – abbreviations, hook sizes, what the crochet skill levels mean, and what the yarn categories mean. 

8. What else is included? 

There are all sorts of different techniques you will learn if you crochet these cowls. 
You can learn how to work beaded crochet, in Art Deco Skyline


Or learn Mosaic Crochet, in Magenta Mosaic.

 Pearly Grapes will teach you how to work Tunisian Knit and Purl stitches. 

Intarsia Arrows will teach you how to work Tunisian Colorwork. 


And there's so much more: Tunisian Double hook techniques, crochet through the back loop, Tunisian Full stitch, Loop stitch, etc. 
So, all in all, Crochet Cowls is a very thorough book.

When I looked through the book, I saw 5 or 6 cowls that I immediately wanted to make. Or at least try out their stitch patterns, because they intrigued me. I found some yarn to work with and I got started.
The first one that intrigued me was the Maritime Chevrons

I love to crochet chevrons, and I like to use different techniques to make them. I have two favorite techniques, to make the chevrons, but I never thought to put these techniques together. Sharon did, and I really like the way that looked. So I tried it, and this is what my swatch looks like:

I like the way the peaks are sharp, and the trough (Sharon's term) is not overcrowded. I'm going to remember this technique.


Another cowl that I liked was the Loopy Boa.

 I love to make the loop stitch, and wanted to see how Sharon did it, because there are a couple of ways to catch the strand or strands that make the loop. Sharon explained her technique, and showed pictures of how she made them, and she does it just like I do – which I think is the best way and the strongest way to crochet them! (Of course!)
But what Sharon changed, and this was very clever, was the row of stitches that goes between the rows of loop stitches. I found that what she did made the rows of loops seem a lot lighter and fluffier. And the crocheting went much faster.  So this is another technique I will have to remember!
Here's my swatch:


The Zigzag Pip Stitch Cowl stitch pattern was another one that caught my eye. 

First, I loved the way the colors changed in the cowl. And two, the stitch pattern diagram was interesting, not too complicated, and I thought it would be easy to remember. So, I tried the stitch pattern and I liked the swatch. Also, it was an easy stitch pattern to remember. I didn't have to look back and forth between my work and the directions. And the stitch diagram was very easy to follow and understand.
Here's my swatch:


Then I swatched the neck part of the Firelight Tunic. Here's a picture of the tunic:


And here's a picture of my swatch:

I love the look of the ribbing, and how it was created.

The Double Strand Delight was next, but I used only one strand to work my swatch. You'll learn how to work a large cluster with this pattern.
Here's the cowl:


And here's my swatch:


Finally, I was intrigued by Atlantic Ice, the cowl on the cover of the book. The stitch diagram helped a lot, and I took Sharon's advice to crocheters who have not worked with mohair before. (I have, but didn't have any handy.) She said to use one strand of worsted weight yarn (the pattern uses two strands of lace weight mohair) to practice to become famliar with the pattern before starting with the mohair. So I used one strand of cotton yarn, and I was able to follow the stitch diagram very easily. I discovered that the pattern is not that complicated. Try it, you'll like it!
Here's the cowl:


And here's my swatch:


So once again, Sharon's book meets my criteria for a great crochet book that I want to have for my Crochet Book library. I know that there are many great stitch patterns in there, and even if I don't want to make a cowl, I can still use the stitch patterns. Plus, there are a lot of different techniques included. If you also want the book, you can order it from Amazon here:
Crochet Cowls


Or, you can write a comment below. Tell me which cowl you would like to crochet first, or which stitch pattern you would like to try, and leave your email address so I can get in touch with you (I won't publish that), and in one week, Wednesday, October 5, I will pick one winner to receive a free copy of Crochet Cowls - your choice - print or ebook.

Good luck!

Shanken Photography took the professional pictures. I took pictures of my swatches.


Wednesday, July 6, 2016

LEARN TO CROCHET RIPPLES

Sometimes I think I sound like a broken record - but here I go again: Sharon Silverman has done it again! This time, though, it's not a book. It's a video class from Annie's - 
Learn to Crochet Ripples.

 If you've never taken an on-line class before, what are you waiting for? You get to see the actual stitches as they are worked. And it's close-up. If you missed something the first time you watched, or just want to see it done again, you can replay the video for 30 seconds, 60 seconds, or 90 seconds, so you can watch a particular technique until you get it! You can also hit the rewind button, and replay however much you want. You have access to the class forever, so you can watch it where ever and whenever you want. As many times as you want. You can ask the teacher questions, and she'll answer you. And you can stop the class at any time, and pick up where you stopped it the next time you want to watch it. And in her class, Sharon is very thorough - giving you hints and tips along the way. She seems to be talking directly to you, and it feels like she wants you to have a good experience in her class. 

So, what will you learn in this class? Sharon shows you 5 different ways to create ripples, in 5 different patterns. In your class materials, which you can download, you get patterns for a ripple dishcloth, a ripple scarf, a ripple tote, a ripple cowl, and a different kind of ripple blanket. And there are 5 different ways to make the ripples. The patterns include stitch diagrams, with the pattern stitch repeat marked. So if you like one ripple stitch pattern, but want to make something different than what is shown, you can. (You might like the stitch pattern for the purse, but want to make a scarf with it, or you might like the stitch pattern for the cowl, but want to make a shawl with it, or you might like the stitch pattern for the blanket, but want to make a scarf with it - you can do all of this.) The stitch pattern diagrams will show you how many chains you need for each stitch pattern repetition, so you can figure out how many chains you'll need to begin, if you're going to change up the pattern. (And Sharon even tells you not to worry if you have too many chains. She shows you a great tip to get rid of those extra chains.) This is one of my favorite aspects of good books and videos – you can take the basic info (like the stitch patterns and the stitch multiples) and use them to crochet something else. So you're not only getting a pattern book (or video project class in this case), you're getting a stitch dictionary.

These are the patterns that Sharon has in her class:


Blue Waves Washcloth


Lavender & Lilac Scarf


Go-To Ripple Tote


Peekaboo Cowl


Happy Waves Toddler Blanket


If you want to know more about ripples (or chevrons, as they're sometimes called) this class will also give you many methods of making them - each pattern uses a different technique - back loop only, working in the round, color work, and openwork ripples. And you'll learn various ways to make the ripples - increasing and decreasing, or working stitches of different heights to create waves. You'll learn how to make ripples that are aligned or offset. And, finally, if you just want to learn the techniques, but not work all the patterns, you don't have to. Annie's states: 

"You can take any class without making the projects. Class skills can be learned by working with materials you have on hand to make swatches, blocks or small samples."
 In fact, Sharon does that herself in class. She shows the techniques on smaller samples when the actual design is larger. 

Now here's the good news. Annie's has given me a way to give you all a chance to win this class - yes, for free. As a thank you for reading my review. Just leave me a comment about what you would create with ripples, and make sure that I can contact you by leaving me your email address. (Don't worry, your email won't get published - I can remove it from your post before I publish the comment.) I'll do a random drawing for the lucky winner on Monday, July 18. So you'll have time to leave the comment. 

And if you crochet something from Sharon's class, I would love to see a picture!


Thursday, April 21, 2016

One-Skein Baby Projects by Sharon Silverman

When I was growing up, I remember my mother used to sit on the couch in the living room after she came home from work, and crochet or knit. What did she crochet or knit? Gifts for her children, her nieces and nephews, her grandchildren, her children's friends, her children's friends' children. In other words, nothing for herself. That was the way she was. There was always someone who needed a present. She even crocheted and knit baby gifts in advance - when there were no new babies. But she stored the gifts away, for those times when she would need them. She had a "baby gift storage" closet. Between her crocheting, and my grandmother's knitting and crocheting baby gifts, I never had to worry when I started needing to give baby gifts! I learned a lot from my mother and grandmother about gifting. Years later, I started crocheting baby gifts when my niece had her first child. I remember my mother had passed away and I was the only one in our family who could crochet the official baby afghan (it was a granny square one), so I put hook to yarn and I did it! I designed my own version of the afghan, but it was still the "official" family baby gift. Since then, I have made many, many more of them - for relatives, friends, family, etc. There seems to always be someone who needs a baby gift. It doesn't necessarily have to be an afghan. It can be a bib, booties, a hat, a rattle, a toy, washcloths, and yes, a little afghan (I like to call them "shlep-along" afghans, because they're perfect size for the baby to drag with him/her.) I keep trying to fill my baby gift storage closet, and this new book - One-Skein Baby Projects - Quick and Thrifty Gifts to Welcome New Arrivals - by Sharon Silverman - (published by Leisure Arts) will help with this. 


What's in this book? There are 9 projects. Each one uses one skein or a few "mini-skeins". These are the 9 projects:


Note what is written in the red rectangle - "LOOK FOR THE CAMERA in our instructions and watch our technique videos made just for you!"

In other words, not only can you add projects to your Baby Gift Storage Closet (you do have one, don't you?), you can learn some new techniques while you're at it. What techniques? How to work front and back post stitches, how to whipstitch motifs together, how to work a Foundation Double Crochet, how to make a pom-pom, how to crochet evenly spaced stitches across ends of rows, how to crochet in the back loop only, how to sew a backstitch, how to work split single crochet stitches, how to work a Foundation Half Double Crochet, how to join yarn with a single crochet, how to work a cluster stitch, and more. And the projects don't use much yarn. I like the baby bibs, and the rattle, and the hat, and the bouncy block, and the booties for cuties.... I guess I like all the patterns in the book!

Oh, another thing that's a positive for this book - they print the instructions for different sizes in different colors - so the patterns are easy for you to use. And they have pictures of how to make the stitches, when necessary. And stitch pattern templates when needed. 

The book is available as a digital download, or a paperback. And here is the website where you can order it from:
Leisure Arts

I would love to see your crocheted baby projects from this book. Be sure to post a picture! And I hope you're Baby Gift Storage Closet gets full to overflowing!!!

Sunday, April 10, 2016

Cloudborn Yarn from Craftsy

Craftsy, the awesome online site that offers courses in just about everything you've ever wanted (like crochet, knitting, drawing, painting, sewing, quilting, cooking, photography, and more!) has just started offering an exclusive line of yarns, for all of us yarnies (some people might call us yarn addicts) out there. The yarn is called Cloudborn, and it comes in weights from sock yarn to bulky roving yarn. And colors - just take a look at a picture of just some of the colors:
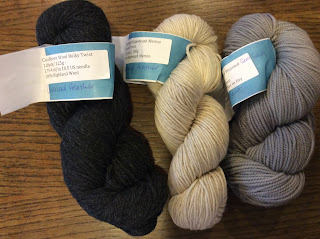
 Craftsy reached out to some of their instructors (my class on Craftsy is Mastering Foundation Crochet Stitches, and if you click on the title, you'll get a 50% off coupon to purchase the class, if you haven't done it yet) to review the yarn, and I eagerly accepted. I asked Craftsy if they could send me a skein in worsted weight, to swatch with. They did better than that - they sent me three skeins - one, a Wool Bulky Twist in Charcoal Heather - 228 yds in a skein, two - a Superwash Merino Worsted Twist in Oatmeal Heather - 221 yds in a skein, and three - one Highland Worsted in the color Storm Front - 220 yds in a skein. Here's a picture of the 3 skeins:


Lots of yardage in each skein, as you can see. And the yarn was so soft - not scratchy like wool often is. So now I had a problem. While I was waiting for the yarn to arrive, I was thinking that I would just swatch with the yarn - do different stitch patterns, make small squares and rectangles - just see how the yarn looked and felt and worked up. But when I actually received the yarn, got to touch it, got to look at it, I decided to do something else. I had about 660 yards of super soft yarn, in 3 colors that looked good together. I didn't want to just swatch with it, I wanted to crochet something that I could use. Something I could wear. A sweater, perhaps, or maybe a shawl. I had to pick a stitch pattern that would show off the yarn, and would be easy to modify if I ran out of yarn before I finished the sweater. So - I picked one of my favorite stitch patterns - a Granny Rectangle. And I got started. (You can find the pattern to a Granny Rectangle in my above-mentioned class.)

First, I had to wind the yarn. I usually do that by hand - and this was super easy. No tangles at all. Then, I had to decide what size hook I would use. I wanted the stitches to be light and lacy, but not too lacy. I had 2 different weights of yarn - bulky and worsted - so I had to be careful that the hook I picked worked with both weights. Luckily, the bulky yarn is not that much different from the worsted. So I thought either a J-10 (6mm), a K-10.5 (6.5mm) or an L-11 (8mm). I went for the middle size, tried it, and I liked the way it felt and worked up. I also tried the L hook - the stitches were too loose. And the J hook - the hook caught on the yarn. So K-10.5 it was. These were Susan Bates in-line hooks, in case you're wondering.

Second, I had to figure out how long and how wide I wanted my 2 front panels. And how many rectangles across I would have. I decided 2 rectangles across each side of the front, and 2 rectangles down. I know how loose I like my sweaters (my friends call them Marty Cardis, because I make so many of them) so I divided the width of one front panel in two, to get the width of each of the two Granny Rectangles on one side of the front. I know how long I like my sweaters - so I divided that measurement in two, to get the length of each of the two Granny Rectangles that are in the column. Then, I figured out the size of the center starting row of my Granny Rectangles. (How to figure it out - length of finished rectangle minus width of finished rectangle is how long your starting center row should be. More information is in my Craftsy class - link is above.)

Then, after all these preliminaries, I got started. I finished one front, and took a picture. It's going to be a "join-as-you-go" sweater, and I'm one-quarter finished. But, when I took the picture of the finished front, I noticed that I joined one part of one of the rectangles in the wrong place. (That's what happens when you watch a tension-filled NetFlix series while you're working!) So I had to fix it before I went any further.
Here's a picture of my sweater with the mistake in the joining:


 In case you were wondering - the two rectangles on the bottom, the bottom corner join that joins the two rectangles is the one that's not joined in the right place. 
Here's a picture of the corrected joining:


Can you see how much better it looks? It's important to check every thing you do, as you do it! Also, the picture shows the columns on their side. Imagine them rotated 90 degrees, and you'll get an idea of what one side of the front will look like. 

And look at the colors - the dark gray is the Charcoal Heather Bulky Twist, the lighter gray is the Highland Worsted Storm Front, and the lightest color is the Superwash Merino Worsted Oatmeal Heather. I think the colors look great together! And even though there are two different weights of yarn (bulky and worsted) the rectangles still fit together nicely. 

Now here's some really good news! This yarn is on sale from now until Wednesday, April 20, 2016.  And you can buy skeins or kits with patterns included. And here's the link:
Cloudborn Yarn
 But wait - there's more! There's free shipping for $99.00 or more, for orders to the US.

Here is what Craftsy says about their Cloudborn yarns:

"For fiber addicts, Cloudborn Fibers is the brand of affordable indulgence that’s so stunning, you’ll want to use for all of your projects. Other yarns can’t compare to the luxe hand and exceptional, innovative color of Cloudborn, especially at such a great value."

And they are absolutely right! 

Meanwhile, keep checking back here - I'll post a picture as soon as I'm finished with my Marty Cardi!

Sunday, March 6, 2016

Classic Crochet Blankets - 18 Timeless Patterns to Keep You Warm

I live in what most people think is the South, (I know thought it was the South before I moved here many years ago), but it's not far enough south to escape the cold winters. And this winter seems to be extra cold. All I want to do is sit by the fireplace and crochet warm afghans. So when I was asked to review a new book of afghans by Interweave Crochet, Interweave Presents Classic Crochet Blankets, 18 Timeless Patterns to Keep You Warm, I jumped right on it. Just what I needed!!  And if you're like me, it's just what you need, too!


Let me tell you what's inside: 4 patterns by Kristin Omdahl, 3 patterns by Ellen Gormley, 2 patterns by Bonnie Barker, 1 pattern by Doris Chan, 1 pattern by Kathy Merrick, 1 pattern by Marly Bird, 1 pattern by Maryse Roudier, 1 pattern by Leigh Radford, 1 pattern by Kathie Eng, 1 pattern by Sarah London,  1 pattern by Tammy Hildebrand, and 1 pattern by Mari Lynn Patrick. 
They all use a variety of yarns: 12 use worsted weight (#4), 4 use Dk light (#3), and 2 use sport weight fine (#2). So no matter what yarn weight you like to work with, you'll have choices!
The book goes beyond the afghans, though. It describes optional edgings you can use - with directions. And all the patterns have stitch diagrams that help explain the stitches and stitch patterns. But more than that, at the end of the book is a tutorial on how to read stitch diagrams. 
These are some of the patterns that tickled my fancy:

Kaleidoscope Afghan by Tammy Hildebrand


Dots + Dashes Blanket by Ellen Gormley


Exploded Pineapple Afghan by Doris Chan


Behrens Colorblock Afghan by Leigh Radford


Chevron Bedspread by Kathie Eng


Granny Sofa Blanket by Sarah London


And the cover afghan - Moroccan Tile Afghan by Kristin Omdahl


Another thing that's nice about many of these afghans (the ones pictured here, and more in the book) - they're made with motifs, so you can crochet them with scrap yarns. It's a great way to use up your stash, have something nice that you crocheted, and make room for more stash!!! :-)

To find out more about this book, and to order it, here's the link:
http://www.interweavestore.com/interweave-presents-classic-crochet-blankets

Post a comment and let me know what you like to crochet when it's so cold outside! And if you do crochet one of these blankets, I would love to see it. 


Saturday, February 20, 2016

New Year's Crochet Resolutions

Last year – 2015 – (that still sounds strange!) – I decided to see what yarns I had in my stash. Or, at least, in some of my stash. For the past few years, at the beginning of the year, I made a resolution regarding my stash yarns. A couple of times, I decided that each month I would select one of the plastic containers or plastic storage bags of yarn that I have, and do something with the yarn that was in it. Either crochet something, or donate the yarn to a person or organization that crochets or knits for charity. Just so I would use up all the yarn in the bag or box. I've done that, and it's been fun, plus it lets me accumulate more stash yarn.
Last year, 2015, I went searching in some of the yarn and project containers that I hadn't searched for awhile. And I found a lot of yarn. But I also found a lot of unfinished projects (UFOs) – lots of sweaters that I had forgotten about. Many of them just needed the finishing touches – an edging, joining together, weaving in ends, etc. I also discovered totes and baskets that I started and hadn't finished. And some cowls and scarves and shawls. So, I decided that my New Year's resolution for 2015 would be to finish at least one of these each month – focusing more on the sweaters. Also, if I decided to start fresh on a sweater, I had to use stash yarns and finish it!
I am happy that I succeeded in this – and more. This is what I did that counted toward my resolution goal:
Finishing a sweater – I did the finishing touches on 4 sweaters – a white one, 2 blue ones, and a self-striping one.
New sweaters – I crocheted 4 sweaters, start to finish, all out of stash yarns – a white one, a green one, a blue one, and a self-striping one,
Shawls – I finished up 2 shawls.
Afghans – I started and finished 2 baby afghans, and 1 "schlep-along afghan, all out of stash yarns.
Baskets – I started and finished 3 large baskets, 12" or more in diameter, out of stash yarns.
I started and finished two more projects  – a tote bag that I felted, and another sweater – both out of stash yarns.
I also started 2 other sweaters, but decided to put them aside for a while.

I know I did more projects – another baby afghan for Redheart Yarns (here's the link to the FREE pattern Tropical Baby Blanket), and other projects I can't mention yet, but the 17+ projects above are the stash-buster ones – they're the ones that I either finished, or started and finished, made with my stash yarns. Oh – I also donated some yarns to various organizations that crochet for charities. And I used some stash yarns to make scarves and hats and shawls for our Yarn Guild's Chase the Chill project (and had to finish some of them that were already crocheted!) I also finished a couple of cowls. And a tote that I had started. So I think 2015 was a successful stash-busting year!

Here is a picture of a pile of projects that I made or finished in 2015.

And here are 2 of the baskets I made.


I will take a picture of some of the scarves and cowls I've made, just as soon as I can gather them all together!  :-)

This January, for 2016, I made the same resolution – because I still have unfinished projects staring me in the face. Three of them I just started in January – a sweater and 2 totes. The sweater is finished, all the ends woven in. The totes are also finished. All ends woven in! I've worked on cowls and scarves – and finished them. (I've lost count of how many!) And I'll soon continue on a few more sweaters that need a little more work – and finish those. And if my goal is just one for each month, I will be able to meet that goal again this year. (In fact, it's just 2 months, and I'm almost at that goal!) And I'll have more sweaters to wear! And more totes and bags to use! And more scarves and cowls to keep me warm. And less stash yarn, so I'll have to replenish it! Yay!!!